Vim Tips
Vim作为Linux下必备开发工具,熟练掌握,可以大大提升开发及编辑效率。
基本上所有Linux发行版都预装了Vim,开箱即用,唾手可得,无需再下载安装。
Vim强大的同时也带来了复杂性,学习成本较高,需要慢慢积累,先掌握基础操作,然后再遇到问题解决问题。Vim使用近三年,自己掌握了一些Vim有意思的特性,现在分享出来,希望对你也有帮助。
Think Vim before you use Emacs.
0. tab, window, buffer
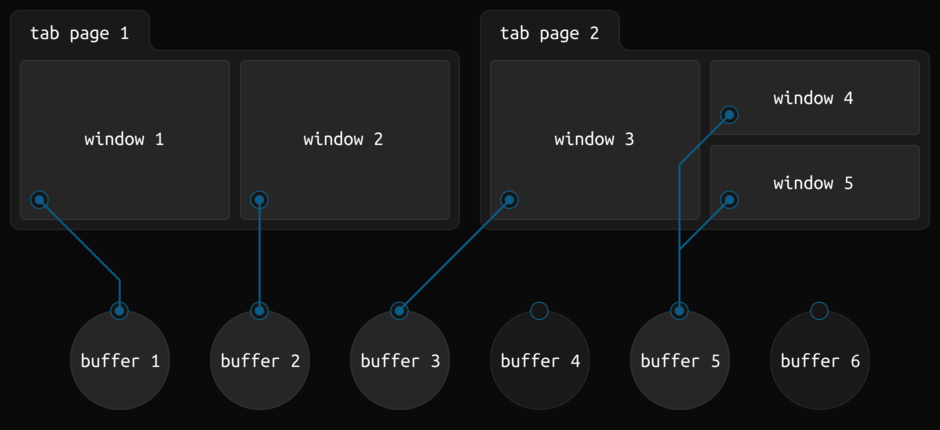
An illustration of the relationships among Vim’s tabs, windows, and buffers. Buffers 4 and 6 are considered hidden, since they are not visible in any window.
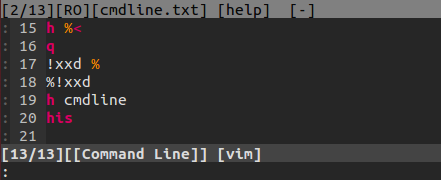
1. command-line window
In the command-line window the command line can be edited just like editing in any window.
To open command-line window, From Normal mode, use the "q:", "q/" or "q?" command.
2. edit binary file
The following command replaces the buffer with a hex dump:
:%!xxd |
You can edit the hex bytes, then convert the file back to binary with the command:
:%!xxd -r |
The above command reverses the hex dump by converting the hex bytes to binary (the printable text in the right column is ignored).

- % current file name
- %< current file name without extension
:%!hexdump -C |

:%!xxd -p |

:%!xxd -p -r |

- -p -plain
- -r -revert
3. indent
gg=G |
In normal mode, typing gg=G will reindent the entire file. This is a special case, = is an operator. Just like d or y, it will act on any text that you move over with a cursor motion command. In this case, gg positions the cursor on the first line, then =G re-indents from the current cursor position to the end of the buffer.
- >> Indent line by shiftwidth spaces
- << De-indent line by shiftwidth spaces
- 5>> Indent 5 lines
- 5== Re-indent 5 lines
4. multiline editing
In visual block mode, you can press I to insert text at the same position in multiple lines, and you can press A to append text to each line in a block.
Insert
- Use Ctrl+V(or Ctrl-Q if you use Ctrl-V for paste) to select the column of text in the lines you want to insert.
- Then hit I and type the text you want to insert.
- Then hit Esc, wait 1 second and the inserted text will appear on every line.
Append
- Use Ctrl+V(or Ctrl-Q if you use Ctrl-V for paste) to select the column of text in the lines you want to append.
- Press $ to extend the visual block to the end of each line.
- Then hit A and type the text you want to append.
- Then hit Esc, wait 1 second and the inserted text will appear on every line.
5. window resize
- equal size ^W=
- max height ^W_
- max width ^W|
6. list mode
:set list displays whitespace, :set nolist displays normally.
set listchars: Strings to use in list mode.
7. digraphs
Digraphs are used to enter characters that normally cannot be entered by an ordinary keyboard.
:dig[raphs] show currently defined digraphs.

In insert mode, CTRL-K {char1} {char2} to enter digraphs.
8. diff mode
$ vimdiff file1 file2 [file3 [file4]] |

- do - Get changes from other window into the current window.
- dp - Put the changes from current window into the other window.
- ]c - Jump to the next change.
- [c - Jump to the previous change.
- zo - open fold.
- zc - close fold.
- :diffu[pdate] - Update the diff highlighting and folds.
- :qa - quit all
- :wa - write all
- :wqa - write, then quit all
- :qa! - force to quit all
9. edit compressed files
To see more info:
:h gzip (*.gz, *.bz2, *.Z) |
10. substitute
:%s/foo/bar/g
Find each occurrence of ‘foo’ (in all lines), and replace it with ‘bar’.
:s/foo/bar/g
Find each occurrence of ‘foo’ (in the current line only), and replace it with ‘bar’.
:%s/foo/bar/gc
Change each ‘foo’ to ‘bar’, but ask for confirmation first.
:5,12s/foo/bar/g
Change each ‘foo’ to ‘bar’ for all lines from line 5 to line 12 (inclusive).
:%s/\s\+$//
Delete all trailing whitespace (at the end of each line).
In a search, \s finds whitespace (a space or a tab), and + finds one or more occurrences.
11. recording a macro
Each register is identified by a letter a to z.
To enter a macro, type:
q<letter><commands>q |
To execute the macro
<number>@<letter> |
So, the complete process looks like:
- qd start recording to register d
- … your complex series of commands
- q stop recording
- @d execute your macro
- @@ execute your macro again
12. count
g CTRL-G (:h g_CTRL-G word-count byte-count) |

{Visual}g CTRL-G (:h v_g_CTRL-G) |

13. changing tabs
:retab |
Replace all sequences of white-space containing a
14. su-write
If you find you do not have permission to perform :w, use the following:
:w !sudo tee % > /dev/null |
15. open file with specified line number
$ vim filename +10 |
+ Start at end of file |
16. jump
In normal mode, % jumps to corresponding item, e.g. from an open brace to its matching closing brace.
Like a web browser, you can go back, then forward:
- Press Ctrl-O to jump back to the previous (older) location.
- Press Ctrl-I (same as Tab) to jump forward to the next (newer) location.
Display the jump list for the current window with:
:jumps |
17. format json
:%!python -m json.tool |